Wednesday 26 January 2022

Microsoft Accessibility - Part 3: MSAA vs UI Automation

 Microsoft has had support for accessibility for a long time. Microsoft Active Accessibility (MSAA) got released with windows 95 in 1995. 10 years later, in 2005 they introduced UI Automation (UI), with Windows Vista. The two are compared here.

  1. Tree structure: Both expose a window or a UI in a hierarchical way represented by a tree.
  2. COM Interface: Both expose COM based interfaces for both assistive technologies (AT) to use, and for software developers to accessibility in their product.
  3. IAccessible, IUIAutomation: Each element of MSAA tree is a COM interface of type IAccessible. Each element of UIA is a COM interface of type IUIAutomation.
  4. Clients: The AT are called clients in both
  5. Servers, Providers: MSAA refers to UI or control offering accessibility as Servers. AUI refers to them as providers.
  6. Performance: UIA allows for caching properties, and tree hierarchy in a client, which leads to better performance.
  7. Flexibility: UIA allows for a far richer set of properties, and patterns to be exposed. It also allows for customs properties and patterns. Extending UIA is much easier.

Despite both of them exposing a tree model for a control the view seen by an AT may be different. Consider the following example.


This is an MFC dialog which an embedded list control. The list control has two columns (colA, colB), and several groups. Each group can have any number of items within it. Each item always has data for colA, while colB might be empty, as it is for item2 above.

Let's try and observe the hierarchy exposed by MSAA, and UIA. For this we will use Inspect tool. The tool has a drop down with which we can select if we are using MSAA, or UIA (Red arrow in the image below). Use RAW view (green arrow below) in both cases so that we can see entire hierarchy.


Following is the MSAA tree of the MFC dialog.

MSAA tree


Following is the UIA tree of the MFC dialog.

UIA tree

In both images the part highlighted by yellow represents the dialog's main window. The part highlighted in red represents the list control. Here is the comparison between the two.

  1. The tree structures are different between the two. Hence an AT using MSAA may convey significantly different information to a user than an AT using UIA.
  2. UIA better represents the visual hierarchy on the dialog. For example the list control has groups as its children, the groups further have the items as its children.
  3. UIA has a richer tree. Each item and sub item (colA, and colB values of items) of the list control has a node of its own. So if we want to refer to "ColB info4", we have a separate node for it in the tree. MSAA only has 4 children for list item body, one for each children. The group, and column structure of the items is not exposed as individual nodes.
  4. Each window of MSAA always has some common children - minimize/maximize buttons, scroll bars, etc. For windows in which these are not present (for example non top level windows) they are marked invisible.
The most important take away from this is that the two trees might not be the same. Moreover a control is free to either expose MSAA, or UIA, or both. A client should not make assumptions about their support. Most win32 native controls support both but the extent to which they are supported might be different. For example MSAA tree does not have separate tree nodes for colB sub items, while UIA has. Thus a client may infer different visual hierarchy from the two. Windows controls have bridging between MSAA and UIA, so many properties if specified using one API may reflect in the other. However this applies to common properties only, and then too not always.

References


Saturday 27 November 2021

Microsoft Accessibility - Part 2: Of Properties and Patterns

 This is continuation of Part 1 of the series on Microsoft Accessibility.

  1. Microsoft Accessibility - Part 1: Introduction
  2. Microsoft Accessibility - Part 2: Of Properties and Patterns

Properties and Patterns

Any assistive technology (AT) such as Windows Narrator is interested in three things that a control has.

  1. Properties
  2. Patterns
  3. Events
Properties are name-value pairs of data associated with a control. Patterns are methods and interfaces that can be invoked on a control. With events your control can notify the AT about its state changes. We defer discussion on events to the future.

Consider the "Press Me" button in the following MFC dialog.

MFC Dialog

Properties associated with it would be things like its name - "Press Me", Type of control - "Button", etc. Patterns associated would be IInvokeProvider (also known as Invoke Pattern), etc. The IInvokeProvider pattern for eg. will allow an AT to programmatically press the button. Here is what accessibility Insights shows for the button. The upper pane on the right shows properties, while the lower column shows the patterns.

Accessibility insights output


The properties of a control is exposed through a special interface IRawElementProviderSimple::GetPropertyValue().


Specifying properties


For native win32 controls most of the required properties, and patterns are already implemented. There are instances, however, when some of these default properties are missing, or are incorrect. We can use OS API to specify these properties. Note that doing this will work only when IRawElementProviderSimple::GetPropertyValue() interface is implemented by OS. If you are implementing the interface yourself, and not calling the OS version of the interface, then specifying this property via the OS API wont do anything.

Such a technique where the accessibility to a control is provided via proxies (by the OS), but the application (or the control) itself specifies some of the properties is called dynamic annotation. There are three types of dynamic annotation: 
  • Direct annotation (IAccPropServices::SetPropValue(), IAccPropServices::SetHwndPropStr(), etc.): Direct annotation is used to specify properties which stay constant over time, and is the one we will be studying here.
  • Value-mapped annotation (say for certain slider controls, uses IAccPropServices::SetHwndPropStr(), etc.): Value mapped annotation can be used to specify a mapping for the values/strings displayed in a control to some other value. Eg. in a slider control we may have 0, 1, 2, etc. as ticks. These may represent different resolutions of a display in a setting application. Without annotation AT will read the values as 0, 1, 2, etc. but we can use annotation so that AT will read 0 as 800x600, 1 as 1280x720, and so on.
  • Server annotation (IAccPropServices::SetPropServer(), IAccPropServer, etc.). This can be used to associate a class with a control item. The control item may be a whole window, or one of the sub elements of its UI. Whenever the AT gets properties for the item it calls the class methods. This will have a blog post of its own.


Via RC files


For some controls, the name property can be specified from within RC file itself. It is fairly simple and explained here. This method is quite limited as only the name property can be specified , and it can only be used with some controls.

Using COM API


For specifying properties, we can use CAccPropServices COM API (oleacc.h, oleacc.dll).


IAccPropServices* pAccService = nullptr;
CoCreateInstance(__uuidof(CAccPropServices), nullptr, CLSCTX_INPROC, IID_PPV_ARGS(&pAccService));

Now we invoke SetHwndPropStr() on this interface. For example this is how we set name.

TCHAR *NameStr = _T("Press Me");
pAccService->SetHwndPropStr(hWnd, (DWORD)OBJID_CLIENT, (DWORD)CHILDID_SELF, Name_Property_GUID, NameStr);

Here OBJID_CLIENT indicates that we are referring to the whole window (or just the client area if the window has non client area as well) represented by hWnd. CHILDID_SELF indicates that we are referring to the control rather than one of its children.

You must include "initguid.h", and "UIAutomation.h" header files. Include "initguid.h" first.
As these are com API, you will have to initialize COM before using them.

CoInitialize(NULL);

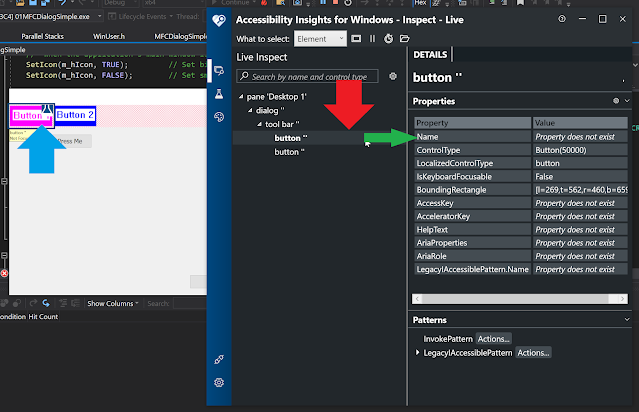
In the Accessibility Insights screenshot given above we can see that the "HelpText" property does not exist. Let us use this COM API to specify it.

TCHAR* HelpTextStr = _T("This button is used to demonstrate accessibility API");
pAccService->SetHwndPropStr(hWnd, (DWORD)OBJID_CLIENT, (DWORD)CHILDID_SELF, HelpText_Property_GUID, HelpTextStr);

Here is what Accessibility insights now reports for this control. Compare the "HelpText" property with the that in the previous screenshot.


Do cleanup when your control is getting destroyed.

MSAAPROPID props[] = { Name_Property_GUID, HelpText_Property_GUID };
pAccService->ClearHwndProps(GetSafeHwnd(), (DWORD)OBJID_CLIENT, (DWORD)CHILDID_SELF, props, ARRAYSIZE(props));
pAccService->Release();
CoUninitialize();

The sample code for all this is present on Github. Check InitAccessibility(), and DeInitAccessibility() methods in 01MFCDialogSimple project.

A note on Object ID (idObject), and Child ID (idChild) [3]


Consider the prototype for IAccPropServices::SetHwndPropStr()

HRESULT SetHwndPropStr(
  [in] HWND       hwnd,
  [in] DWORD      idObject,
  [in] DWORD      idChild,
  [in] MSAAPROPID idProp,
  [in] LPCWSTR    str
);

hwnd, idObject, and idChild together refer to a UI element. 'hwnd' refers to the window of a control.

idObject refers to the kind of object within the window (specified by hwnd) we want to refer to.
Here are some of the values it can take.
  • OBJID_CLIENT: Refers to window's client area. It excludes non client area (frame, etc of the window)
  • OBJID_WINDOW: Refers to the whole window. This includes the client area (OBJID_CLIENT), and non-client area
  • OBJID_TITLEBAR; Refers to the title bar of the window
  • OBJID_HSCROLL: Windows horizontal scroll bar
  • OBJID_VSCROLL: Windows vertical scroll bar
  • OBJID_CARET: caret in the window
  • OBJID_CURSOR: mouse pointer
  • Other values (from WinUser.h): OBJID_SYSMENU, OBJID_MENU, OBJID_CLIENT, OBJID_SIZEGRIP, OBJID_ALERT, OBJID_SOUND, OBJID_QUERYCLASSNAMEIDX, OBJID_NATIVEOM
idChild is used to specify one of the child controls within the Window. The Child ID can either be obtained via either the IEnumVARIANT interface if the control supports it, otherwise the child ID are usually in increasing integral order starting with 1. A special value CHILDID_SELF refers to the object itself rather than one of its children.

Specifying properties for non window (non hwnd) controls


Frequently we encounter controls which don't have a window of their own. For example in the toolbar control of notepad++ we can see that the child controls of the toolbar are not a window in themselves. The toolbar is a window, and draws the child controls as bitmaps within itself.

Notepad++ toolbar

In this image we can see that while Window Detective does not show any children of the toolbar, accessibility insights does. This is because the buttons shown in the toolbar are not individual windows hence Windows Detective is not able to detect them. Accessibility insights on the other hand uses automation to enumerate child controls of the toolbar (perhaps via IAccessible interface), and the toolbar is able to convey information about the children it has.

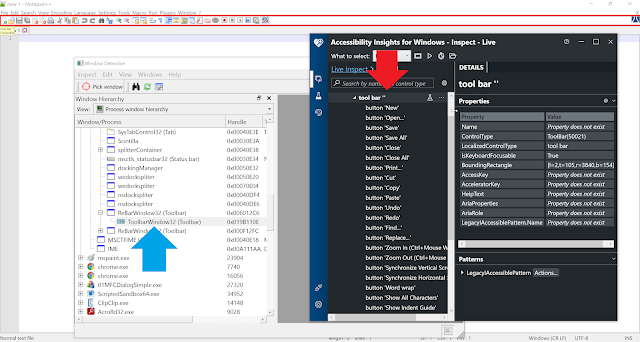
To make things simpler I have modified our MFC dialog so that it now has a toolbar. The toolbar has a background of red cross lines. It has 2 buttons - Button 1, and Button 2. When you compare outputs of Window Detective, and accessibility insights in the following image you see observations similar to notepad++, ie. the buttons are not listed in Window Detective, but are listed in accessibility insights.

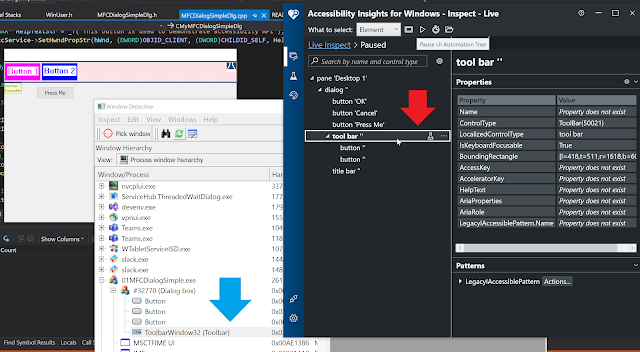
MFC Simple Dialog with toolbar

Let us use this to understand how properties for non-window controls can be specified (Button 1, and 2 above). The toolbar does not support IEnumVARIANT interface (which can be seen from Patterns pane of accessibility insights), thus it is safe to assume that child Id would be 1, and 2 respectively for the two buttons. You can also use tools like Inspect to obtain child id.

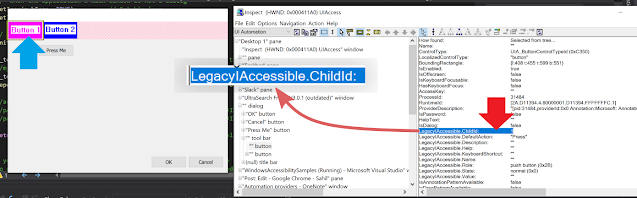
Child ID from Inspect.exe

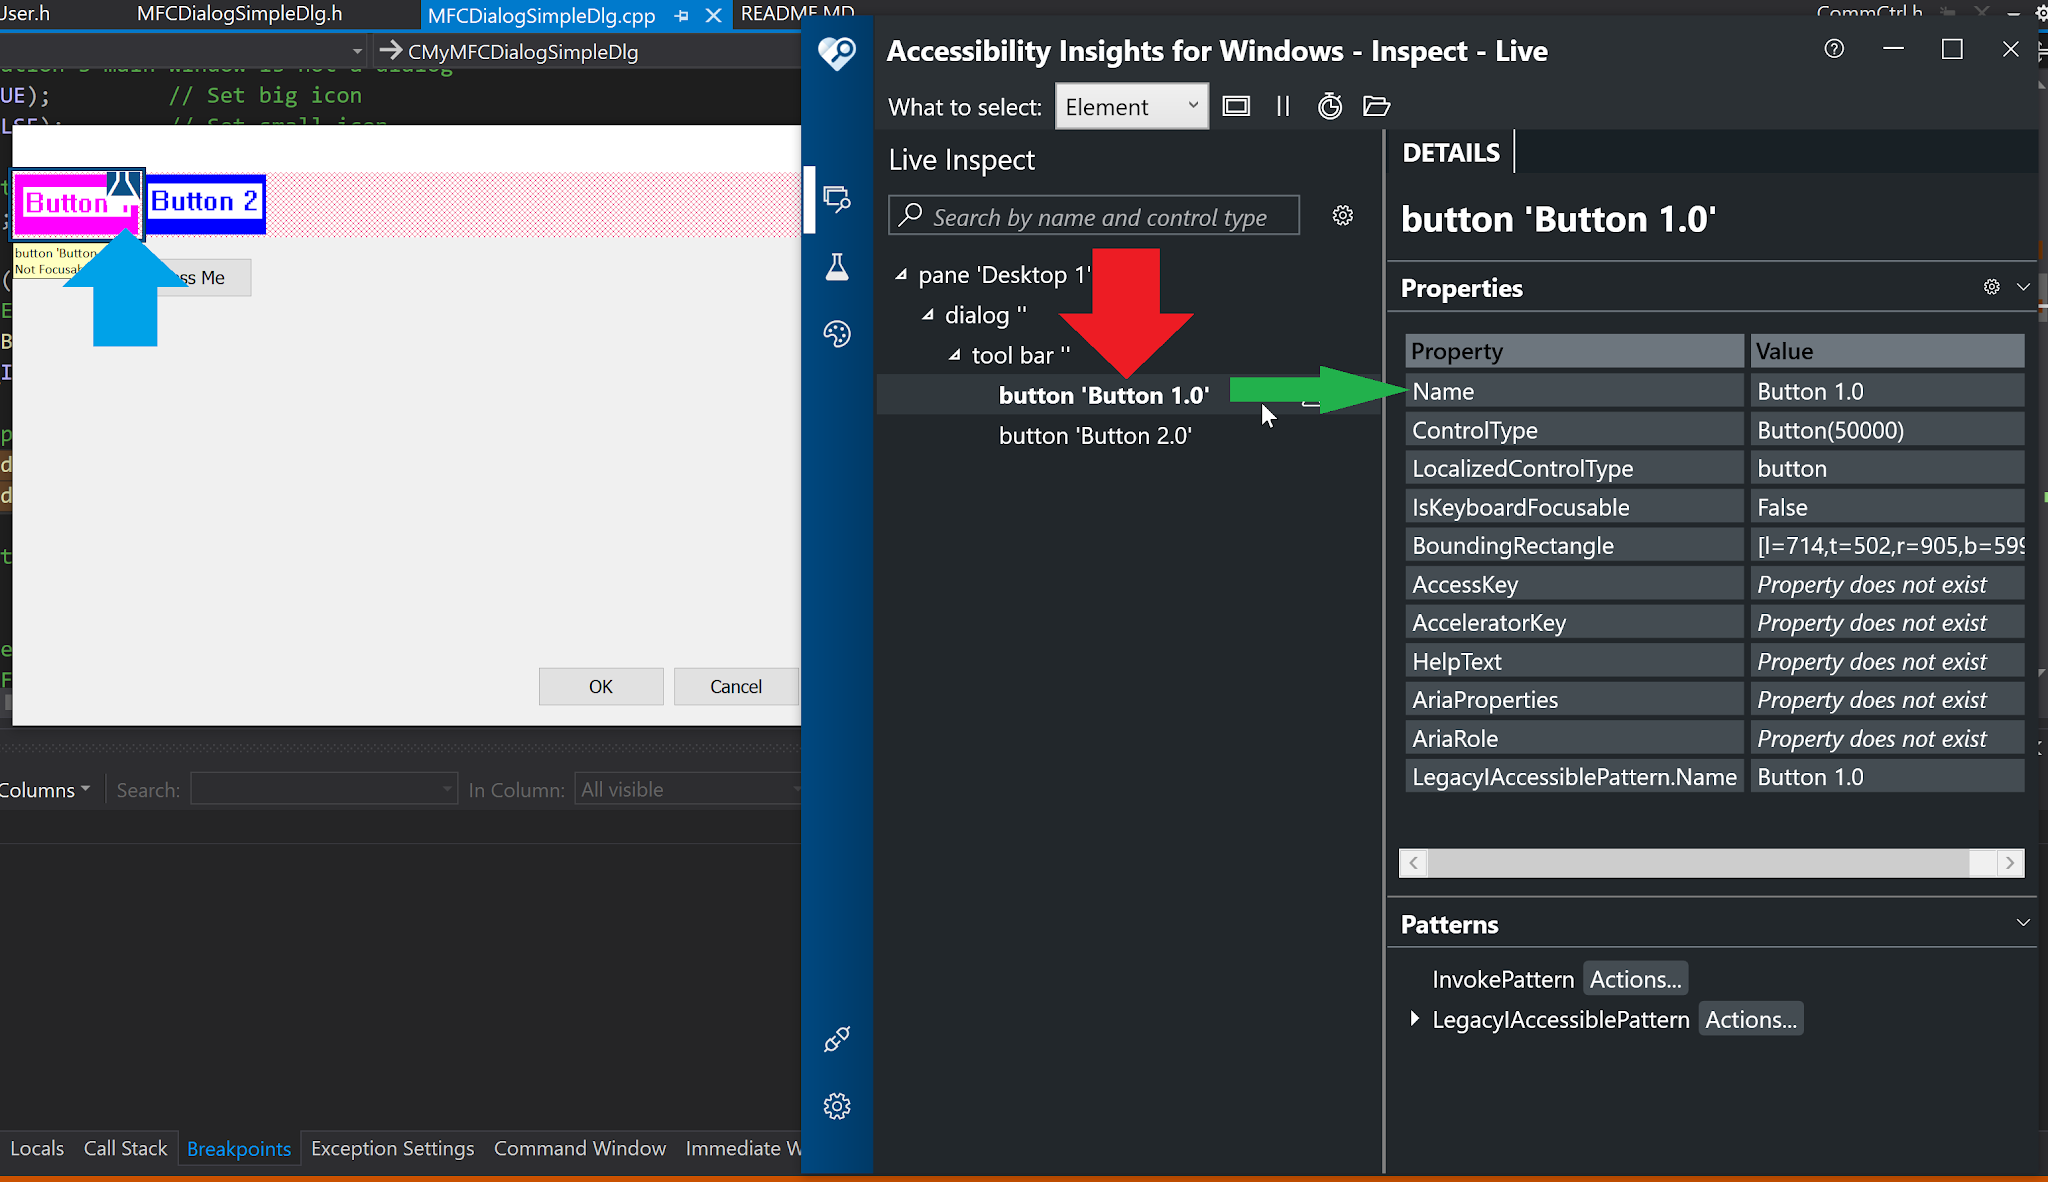
Let us see the properties reported by Accessibility insight for button 1.

Name property for button 1 doesn't exist


Notice that the Name property does not exist. We will now use the IAccPropServices::SetHwndPropStr interface once more to set this, but this time we will pass integers 1, and 2 for the two buttons, instead of CHILDID_SELF.

pAccService->SetHwndPropStr(m_toolbar1.GetSafeHwnd(), (DWORD)OBJID_CLIENT, (DWORD)1, Name_Property_GUID, _T("Button 1.0"));
pAccService->SetHwndPropStr(m_toolbar1.GetSafeHwnd(), (DWORD)OBJID_CLIENT, (DWORD)2, Name_Property_GUID, _T("Button 2.0"));

Take a note of the hwnd, object Id, child ID, and the value of string parameters passed above. Let us see what accessibility insights reports now.

Name property for button 1 now set

The name property is now being reported corrected. 

As mentioned before, the sample code for all this (updated to include the toolbar) is present on Github.

References


Saturday 20 November 2021

Microsoft Accessibility - Part 1: Introduction

This series of blog posts tries to look at Microsoft Accessibility from a developer's point of view - making sure your product works well with assistive technologies like Windows Narrator. The focus is primarily on native developers - C++/MFC/Win32,etc.

Here is a how Microsoft defines Accessibility.

"... enables Windows applications to provide and consume programmatic information about user interfaces (UIs). It provides programmatic access to most UI elements on the desktop. It enables assistive technology products, such as screen readers, to provide information about the UI to end users and to manipulate the UI by means other than standard input. UI Automation also allows automated test scripts to interact with the UI"

Accessibility is a way by which other software can read and understand what is displayed in your window. This is used in assistive technology products like screen readers, and for running automated scripts on your application (eg. for automated UI testing).

Significance of having your application support accessibility technologies


When talking about assistive technologies people often imagine (erroneously) users which have severe disabilities - like complete loss of vision. Accessibility pertains to a wide range of people with a wide range of abilities, not just the folks with disabilities([1]). Another fallacy is to assume that people who need such technologies are only a small fraction of your overall user base (The myth of the minority user). They can constitute more than 50% of your userbase. Here are some data from Forrester Research 2004 study([1]).
  1. 44% of computer users use some form of assistive technology
  2. 57% of computer users could benefit from assistive technologies
  3. 1 in 4 people experience visual difficulties
  4. 1 in 4 experience a pain in wrists or hands
  5. 1 in 5 experience hearing difficulty
  6. 57 million users of accessibility technologies in 2003, and it was only expected to grow year on year.
Such data are an eye opener. Not only the people needing assistive technologies is not small, they constitute a big fraction of all computer users. Additionally, many countries have laws which make it mandatory for your software to support various forms of accessibility (see this, and this - Minimize Legal Risk). Norway for example fines commercial websites which fail to support accessibility([2]).

Thus the time and money you invest in making your product accessible will be worthwhile.

Microsoft accessibility frameworks - Active accessibility, and UI Automation


MS has had native support for accessibility frameworks since Windows 95 days. As of now there are two main frameworks - Microsoft Active accessibility (MSAA), and UI Automation (UIA). Active accessibility is the older framework, which has been there since Win95 days. UI Automation is the newer framework release in 2005 with Vista, and tries to overcome limitations of MSAA. MSAA is simpler to implement, but is also limited in features and performance. If your software supports neither, and you are beginning to support one of these, it is better to implement UIA. Note that the same software if needed can implement both MSAA, and UIA.


The focus of this series of articles will be mainly UIA.

How to support UI Automation (UIA) framework - add support for accessibility


For win32 applications to support accessibility they have to implement various COM interfaces, and specify certain properties. For instance there is one COM interface which allows an assistive technology (AT) like Screen reader to read the name of a button (IRawElementProviderSimple::GetPropertyValue()), there is another interface which allows an AT to click the button (IInvokeProvider), there is an interface which allows an AT to read, and set values in a text control (IValueProvider), and so on. These interfaces are also known as patterns. MS maintains a mapping of control type, and patterns it must support (See this). It is these mappings which are checked by tools such as Accessibility Insights. Properties are certain pieces of data associated with a control which describe it, like name, type of control, etc. While Patterns are interfaces and methods callable on a control, properties are like name-value pairs of data.

Consider the following image which shows info shown by Accessibility insights for a Dialog based MFC application's "OK" button.

Accessibility insights info for OK button

Name, ControlType, etc. are the properties. The Patterns which the control supports are listed in the bottom pane.

Native win32 controls have these patterns, and properties implemented by default. Hence when using Win32, or MFC you will seldom have to tinker with accessibility related stuff. There may be times when the support provided by default isn't enough - say a pattern is missing or a property is not set correctly. You may also have a custom control in your application, which will require the accessibility interfaces to be implemented explicitly from scratch.

In the next few posts we will be diving deeper into some of these concepts.

References

  1. Engineering software for accessibility (book)
  2. https://www.w3.org/WAI/business-case/#minimize-legal-risk
  3. This application handles WM_GETOBJECT, and implements an automation interface - https://github.com/UiPathJapan/RespondingWmGetObject 
  4. Implementing automation provider (blog post) - https://vivekcek.wordpress.com/2015/01/09/ui-automation-provider-for-a-custom-control-problem-to-solution-approach/
  5. List of pattern ID - https://docs.microsoft.com/en-us/windows/win32/winauto/uiauto-controlpattern-ids
  6. Application which tries to implement several Automation provider sever interfaces - https://github.com/netide/netide. See this, and this.
  7. How WM_GETOBJECT works - https://docs.microsoft.com/en-us/windows/win32/winauto/how-wm-getobject-works
  8. Tools - https://docs.microsoft.com/en-us/windows/win32/winauto/testing-tools
  9. Handling WM_GETOBJECT - https://docs.microsoft.com/en-us/windows/win32/winauto/handling-the-wm-getobject-message
  10. Active accessibility vs UI Automation - https://docs.microsoft.com/en-us/windows/win32/winauto/microsoft-active-accessibility-and-ui-automation-compared
  11. https://docs.microsoft.com/en-us/windows/apps/develop/accessibility
  12. MS Code samples - https://github.com/microsoft/Windows-classic-samples/search?q=accessibility&unscoped_q=accessibility
  13. https://docs.microsoft.com/en-us/windows/win32/accessibility/accessibility-whatsnew
  14. https://docs.microsoft.com/en-us/windows/win32/winauto/uiauto-howto-expose-serverside-uiautomation-provider 
  15. Sample win32 custom control that implements IRawElementProviderSimple - https://github.com/microsoft/Windows-classic-samples/tree/main/Samples/UIAutomationSimpleProvider, https://github.com/microsoft/Windows-classic-samples/tree/27ffb0811ca761741502feaefdb591aebf592193/Samples/UIAutomationSimpleProvider 
  16. https://www.linkedin.com/pulse/common-approaches-enhancing-programmatic-your-win32-winforms-barker/
  17. https://github.com/MicrosoftDocs/win32/blob/docs/desktop-src/WinAuto/uiauto-serversideprovider.md
  18. "UI Automation Provider Programmer's Guide" - https://github.com/MicrosoftDocs/win32/blob/docs/desktop-src/WinAuto/uiauto-providerportal.md
  19. Control to patterns mapping - https://docs.microsoft.com/en-us/windows/win32/winauto/uiauto-controlpatternmapping

Wednesday 3 June 2020

Voice Call Bot : Bashing NHS England's appointment booking system

What do you do when you have to call a number for availing a service, but the number being called is so contended that your call never goes through?


The COVID19 crisis has exposed the limitations of several such systems. Case in point, England's NHS (National Health Service). To get a doctor's appointment you have to call them. There is no provision for getting the appointment online. So, if you have to get an appointment for, say getting blood sugar level tested, you will be required to call them, but since the health services are already overwhelmed by COVID19 crisis, and there are thousands of people trying to call them, you, simply won't be able to make the call. Either the network would be busy, or there would be other such problem.

Similar was (and probably still is) the situation in USA. COVID19 has caused unprecedented level of unemployment, leading to a surge in calls to unemployment offices for people wanting to avail unemployment benefits. There have been reports of people calling them hundreds, and thousands of time without success.

The Bot

While people get frustrated, computers are good at doing these mundane, and repetitive tasks.
Our aim is to make a bot which calls NHS on our behalf, and when it is successful, somehow connects us to it.

Here is a state diagram explaining the process.


The bot will keep on trying to call NHS till someone answers. It will then call the user on the given number, and will connect the two calls. The user will be able to talk on the call to NHS as on a normal call.

Prerequisites 

  1. Twilio subscription [Link]
    Twilio has a rich set of telephony API. The downside is that to be able to make calls to real numbers, you will have to convert your account into a normal account if it is a trial account right now. For this you will have to load at least 20 USD in your account. This money will be utilized for making calls.
  2. A server to run the bot. The server has to have a public IP. I purchased a VPS from Digital Ocean for 5 USD a month. You can find cheaper VPS on lowendbox.com. Alternatively you can also use your local machine, however you may have to configure NAT forwarding if you want to make it accessible from public. See configuring VPS section below for more options.

Configuring Twilio 

When you load at least 20 USD in your Twilio account, your account will non longer be in trial, and you will be able to make calls to real numbers. In trial mode, you are only allowed to call Twilio provided numbers. It is a good idea to use these numbers to test your code before investing money.

You also need a number which will be used for caller identification (Caller ID) when making calls from Twilio.
You can either register the number you already have, or buy a new one from Twilio. The former will not cost you anything extra.
For registering an existing number, go to https://www.twilio.com/console/phone-numbers/verified.
For buying a new number you can go to https://www.twilio.com/console/phone-numbers/search.
I used my existing number for the purpose.

Configuring VPS

You will need VPS for 2 reasons.
1. Run script which will invoke Twilio API to make the call.
2. Host an XML file which will tell Twilio what to do once someone answers the call. This will be in TwiML, Twilio Markup language. 
3. Get status feedbacks. As your call progresses through various stages, Twilio will notify you by sending this information to a configured URL. In Twilio's terminology, this is called StatusCallbackEvent.


This is the timeline of a typical Twilio call (image taken from https://www.twilio.com). For each of these stages, when it is reached, the given URL will received information. This is how your code will come to know the status of your call. The call state which is of most interest to us is answered. This is the point which indicates that NHS has picked up our call, and Twilio should call the user on the given mobile number, and then connect the 2 calls.

To save money, you can run the script on your local machine, and get call status feedback on a php script hosted on a website for free. I gave https://infinityfree.net a shot for free hosting, but it didn't work out for me, as the site sets some cookies automatically, and the twilio API wasn't able to handle them, maybe there is a way, but I didn't explore further.

The VPS I purchased had Ubuntu 18.04, with apache2, lib-apache2-mod-php, python, python-pip packages installed. I also had to install Twilio python package from pip.


pip install twilio

Writing scripts

I wrote 2 scripts. One in python, the other in PHP. While the Python script calls Twilio API, the PHP script provides an endpoint where Twilio can send call status events.

The python script

 
from twilio.rest import Client
import os.path
import time
import pdb

# Your Account Sid and Auth Token from twilio.com/console
# DANGER! This is insecure. See http://twil.io/secure
account_sid = 'ACXXXXXXXXXXXXXXXXXXXXXXXXXXXXXXXX'
auth_token = 'YYYYYYYYYYYYYYYYYYYYYYYYYYYYYYYY'
client = Client(account_sid, auth_token)

filePath='/var/www/html/callid.txt'

while True:
    call = client.calls.create(method='GET',  status_callback='http://xxxx.com/yyy.php', status_callback_event=['initiated', 'answered', 'completed'], status_callback_method='POST', url='http://xxxx.com/response.xml', to='+44xxxxxxxxxx', from_='+91xxxxxxxxxx')
    print(call.sid)
    while True:
        if os.path.isfile(filePath):
            print("file exists")
        else:
            print("file does not exist. sleep 5s ...")
            time.sleep(5)
            continue
        try:
            print("sleep 5s ...")
            time.sleep(5)
            with open(filePath) as f:
                fline = f.readline()
                print(fline)
                if(len(fline) == 0):
                    continue
                ftokens=fline.split(' ')
                fcid    =   ftokens[0]
                fstatus =   ftokens[1]
                if str(call.sid).upper() == fcid.upper():
                    print("cid match")
                    if(fstatus.lower() in ["busy", "canceled", "completed", "failed", "no-answer"]):
                        print("call ended. dialing again in 60s ...")
                        time.sleep(60)
                        break
        except IOError:
            print("file open error")

You can get account_sid, and auth_token from twilio console (https://www.twilio.com/console).
Additionally, you will have to configure following parts in the script.
  1. url='http://xxxx.com/response.xml'
    This this the XML file which has Directions written in TwiML.
    Once a call is answered Twilio reads this file to decide the
    actions which have to be taken. For example you can instruct
    Twilio to say something, play an audio file, etc. In our XML file we instruct Twilio to call the user.
    <Response>
            <Say voice="alice">Hello</Say>
            <Dial>+91xxxxxxxxxx</Dial>
    </Response>
    
    The XML file tells twilio to say hello once call is picked up,
    and then dial the given number. The given number will be
    automatically joined to the current call.


  2. status_callback='http://xxxx.com/yyy.php'
    This is the URL on which Twilio sends call status data as call progresses. Once this URL receives information that a call has ended, our python script tries again.
  3. to='+44xxxxxxxxxx', from_='+91xxxxxxxxxx'
    These are the to, and from numbers. In my case to was NHS's number, and from was my number which I had registered with Twilio for caller ID.

The PHP script

The PHP script is meant to receive call status information from Twilio. The PHP, and Python scripts work together to decide when a call failed, so that we can try calling again.

<?php
$req_dump = print_r($_REQUEST, TRUE);
$fp = fopen('request.log', 'a');
fwrite($fp, $req_dump);
fwrite($fp, "#\n");
fclose($fp);

$fp2 = fopen('callid.txt', 'w');
fwrite($fp2, $_REQUEST['CallSid']);
fwrite($fp2, ' ');
fwrite($fp2, $_REQUEST['CallStatus']);
//fwrite($fp2, '\n');
fclose($fp2);

?>
<!DOCTYPE html>
<html>
</html>

This PHP script writes to a file named callid.txt which is monitored by the Python script.
When Python script makes a call it gets an ID identifying the call (call.sid). When it sees that the
status of the call it just placed is one of "busy", "canceled", "completed", "failed", "no-answer", it realises that call has ended, and it is time to try again.

One thing to note here is that the python script will keep calling even when call is disconnected after being answered. Since the user will get a call as soon as call is answered, the user can then manually kill the script, so I didn't feel like investing time on this.

Running the bot

Put the PHP script in apache's directory, and create two files, callid.txt, and request.log in it, with read/write permissions given so that both PHP, and Python scripts are able to access them.

Configure the python script as explained above, and then just run it.
Make sure to kill it once you get a call on your phone.

Parting thoughts

As of now it has been 6 hours since I started the script. Probably the NHS number I have is unattended.
The script does work, as before running it on NHS number I tested it with several US, UK, and Indian numbers.

My initial Idea was to script it using Tasker on Android, but Android sufferes from a major drawback. There is no public API which would tell us if the call has been answered. The dialer on Android starts the call timer only when the call gets answered, this means the OS is aware, but has not exposed any API for it. See the comment on PreciseCallState hidden Android API on the following stack overflow page - https://stackoverflow.com/questions/9684866/how-to-detect-when-phone-is-answered-or-rejected

References

  1. Samples and tutorials on making call using Twilio API - https://www.twilio.com/docs/voice/make-calls?code-sample=code-make-a-call-and-monitor-progress-events&code-language=PHP&code-sdk-version=6.x#specify-a-recordingstatuscallback
  2. Call recording API - https://www.twilio.com/docs/voice/api/call-resource#fetch-a-call-resource 
  3. Twilio conference calls (Note that we didn't use this API in our bot) - https://www.twilio.com/docs/voice/tutorials/how-to-create-conference-calls-python
     

Saturday 14 July 2018

Getting descriptors from a USB device (Windows) - PART 2 (Getting the device descriptor)

As explained in Part 1, the Device descriptor is the most fundamental descriptor a USB device has.

Getting USB Descriptor : Basics

Getting any descriptor from a USB device is a two step process. We first prepare an input buffer in which we put information about the descriptor we need to get, for ex. in the buffer we will tell the type of descriptor we want to get. We then pass the buffer to an IOCTL call, which fills the required output in an output buffer. The ioctl to be used for getting descriptors will be IOCTL_USB_GET_DESCRIPTOR_FROM_NODE_CONNECTION.

IOCTL call
For the sake of simplicity, we will use the same buffer for input and output. This is how Microsoft's USBView program fetches descriptors. It is open sourced by Microsoft, and during my initial days of learning I found the source code to be immensely helpful, specially the enum.c file in the source, which fetches all the descriptors. Github Link.

The buffer consists of two parts - a part in which we specify the descriptor we want to get from the USB device, and a part in which the IOCTL call fills the required information. This information can be for eg. a Device descriptor if we are requesting it.
The first part is typically the same (not always), and consists of a structure called USB_DESCRIPTOR_REQUEST. The second part varies according to the descriptor we are requesting.
Out common buffer would look something like the following.

IOCTL Buffer
Conceptually, the location of a USB device is given by handle of the parent hub, and the port number of the hub to which the USB device is attached. Thus you will see that whenever an IOCTL call is made to get descriptor from a USB device we will always be using these two things for identifying the device.
Let's have a look at some of the important members of USB_DESCRIPTOR_REQUEST.

The USB_DESCRIPTOR_REQUEST Structure

This structure as discussed is used to tell the IOCTL call what information we require, and from which device. The following definition of the structure is copied from usbioctl.h file (located at c:\Program Files (x86)\Windows Kits\10\Include\10.0.17134.0\shared\usbioctl.h on my computer).

 1
 2
 3
 4
 5
 6
 7
 8
 9
10
11
typedef struct _USB_DESCRIPTOR_REQUEST {
    ULONG ConnectionIndex;
    struct {
        UCHAR bmRequest;
        UCHAR bRequest;
        USHORT wValue;
        USHORT wIndex;
        USHORT wLength;
    } SetupPacket;
    UCHAR Data[0];
} USB_DESCRIPTOR_REQUEST, *PUSB_DESCRIPTOR_REQUEST;

  1. Connection Index : Port number of the USB hub to which a device is connected.
  2. bmRequest : It is a bit-field which specifies direction of request, type of request, and recipient. For getting USB descriptors this will always be 0x80.
  3. bRequest: The request being made. Since we are trying to get descriptors, this will be set to USB_REQUEST_GET_DESCRIPTOR. This is a macro which evaluates to 0x06.
  4. wValue : Request dependent parameter. For getting descriptors, this will specify the descriptor we want. Its format would be something like this.

    wValue = (DescryptorType << 8)  | descriptorIndex

    Descriptor index is used when we have several descriptors of the same kind. For ex. it will be used for getting string descriptors, interface descriptors, etc. Since there can be only one device descriptor in a device, the descriptor index will be zero. For getting Device Descriptor, the wValue field will be:

    wValue = (USB_DEVICE_DESCRIPTOR_TYPE << 8 | 0)
  5. wIndex : This is again a request dependent parameter. This will not be used when getting Device descriptors, but for ex. if we want to get string descriptors this field will specify the language ID.
  6. wLength : This in technical terms specifies the number of bytes to be transferred in the data phase of a control request. Do not get overwhelmed by it. In simpler terms this corresponds to the data we are expecting to get from the device. For ex. if we are trying to get Device descriptor, this field will be set to sizeof(USB_DEVICE_DESCRIPTOR). The term data phase relates to the mechanism of data transfer on the USB bus - how a transfer is divided into stages, phases, frames, etc. This is beyond the scope of this post. Refer USB Complete book by Jan Axelson.
  7. Data: Bytes following this member correspond to the output that the ioctl gives.

The SetupDi_ , and CM_ API in Windows

SetupDi_ API in windows is a set of API which can be used to interact with devices present on a system. For ex. If you want to get names of all the monitors connected to a system, use this; if you want to get information about all the USB devices present in the system, use this. Similarly the CM_ API can be used to get information about devices. 
Di, and CM specify the prefixes that the functions in the API sets have, ex. SetupDiGetClassDevs(), CM_Get_Parent(), etc.
To enumerate all the USB devices in the system, we will have to use the following code.


 1
 2
 3
 4
 5
 6
 7
 8
 9
10
11
    /*A set containing info about all USB devices present on the system*/
    HDEVINFO usbDeviceInfoSet = SetupDiGetClassDevs(&GUID_CLASS_USB_DEVICE, NULL, NULL, (DIGCF_PRESENT | DIGCF_DEVICEINTERFACE));

    /*Iterate over the set to obtain info about each device in it*/
    SP_DEVINFO_DATA deviceData;
    deviceData.cbSize = sizeof(SP_DEVIFO_DATA);

    for(int i = 0; SetupDiEnumDeviceInfo(usbDeviceInfoSet, i, &deviceData); i++)
    {
        /*The tuple <usbDeviceInfoSet, deviceData> uniquely identifies a USB device in the system*/
    }

We will not be looking more into these API. The above code will be enough for further exploration. We will encounter more functions from these API sets as we progress.

Getting the Device Descriptor

Now that we have understood the basics, let us move to actually getting the device descriptor of a USB device. Steps 1 to 3 are for getting information from SetupDi_* API, and if already familiar with the API, you can directly jump to step 4.

Step 1: Get <usbDeviceInfoSet, deviceData> tuple

As we learned previously the tuple will uniquely identify a USB device. Use the code given above to enumerate through all devices, and get the tuples for them. To simplify things we will simply be getting device descriptors of all USB devices in the system.

Step 2: Get parent hub handle

We will use the deviceData member from the tuple to get DEVINST structure of the parent device. The parent device of a USB device will always be a HUB.
1
2
DEVINST parentDevInst=0;
 CM_Get_Parent(&parentDevInst, deviceInfoData.DevInst, 0);

Note that we used deviceInfoData.DevInst in the above code. Using parentDevInst we must get device path of the parent device. For this we must iterate through all the hubs on the system using the SetupDi_ APIs we used for USB devices, but this time using GUID_CLASS_USBHUB, instead of GUID_CLASS_USB_DEVICE. Once we have the <usbDeviceInfoSet, deviceData> tuple for the USB hubs, We will compare the DEVINST  with parentDevInst obtained above. For the hub which matches, we can use SetupDiGetDeviceInterfaceDetail() function to get SP_DEVICE_INTERFACE_DETAIL_DATA structure, which contains the device path.

Instead of going the longer way, I have used a shortcut (described here - stackoverflow.com) to get parent device path directly from parentDevInst. The complete code for getting parent hub handle for a USB device is the following.

 1
 2
 3
 4
 5
 6
 7
 8
 9
10
11
12
13
14
15
16
17
18
19
20
21
22
23
24
25
26
27
28
29
30
31
32
33
34
    /*A set containing info about all USB devices present on the system*/
    HDEVINFO usbDeviceInfoSet = SetupDiGetClassDevs(&GUID_CLASS_USB_DEVICE, NULL, NULL, (DIGCF_PRESENT | DIGCF_DEVICEINTERFACE));

    /*Iterate over the set to obtain info about each device in it*/
    SP_DEVINFO_DATA deviceData;
    deviceData.cbSize = sizeof(SP_DEVINFO_DATA);

    for(int i = 0; SetupDiEnumDeviceInfo(usbDeviceInfoSet, i, &deviceData); i++)
    {
        /*The tuple <usbDeviceInfoSet, deviceData> uniquely identifies a USB device in the system*/

        /*Get parent hub handle*/
        DEVINST parentDevInst = 0;
        CM_Get_Parent(&parentDevInst, deviceData.DevInst, 0);
        wchar_t deviceId[MAX_PATH];
        CM_Get_Device_ID(parentDevInst, deviceId, MAX_PATH, 0);
        std::wstring devIdWStr(deviceId);

        //convert device id string to device path - https://stackoverflow.com/a/32641140/981766
        devIdWStr = std::regex_replace(devIdWStr, std::wregex(LR"(\\)"), L"#"); // '\' is special for regex
        devIdWStr = std::regex_replace(devIdWStr, std::wregex(L"^"), LR"(\\?\)", std::regex_constants::format_first_only);
        devIdWStr = std::regex_replace(devIdWStr, std::wregex(L"$"), L"#", std::regex_constants::format_first_only);

        constexpr int sz64 = 64;
        wchar_t guidString[sz64];//guid is 32 chars+4 hyphens+2 paranthesis+null => 64 should be more than enough
        StringFromGUID2(GUID_CLASS_USBHUB, guidString, sz64);
        devIdWStr.append(guidString);

        std::wstring& usbHubPath = devIdWStr; //devIdWStr now contains USB hub path
        HANDLE hUsbHub = CreateFile(usbHubPath.c_str(), GENERIC_WRITE, FILE_SHARE_WRITE, NULL, OPEN_EXISTING, 0, NULL);

        /*hUsbHub now contains the handle to the parent hub of a device*/

    }

Note that this is a modified version of code presented earlier to enumerate USB devices in the system. Also, note that this is a shortcut, a hack, and therefore is not guaranteed to work always. A better (albeit with poorer performance) is the one discussed at the beginning of this step.


Step 3: Get USB port number 

Getting the port number to which a USB device is connected on a hub (the handle to which we obtained in the previous step) is fairly easy. We just have to use SetupDiGetDeviceRegistryProperty() function. Add the following code to the code shown in previous step. To make it easier to understand where this code has to be pasted, the comment "/*hUsbHub now contains the handle to the parent hub of a device*/" is pasted as is from previous code


1
2
3
4
5
6
7
        /*hUsbHub now contains the handle to the parent hub of a device*/

        /*Get port number to which the usb device is attached on the hub*/
        DWORD usbPortNumber = 0, requiredSize = 0;
        SetupDiGetDeviceRegistryProperty(usbDeviceInfoSet, &deviceData, SPDRP_ADDRESS, nullptr, (PBYTE)&usbPortNumber, sizeof(usbPortNumber), &requiredSize);

        /*We now have the port number*/


Step 4: Prepare USB request packet (USB_DESCRIPTOR_REQUEST)

Prepare USB_DESCRIPTOR_REQUEST structure by filling in required information. We have already discussed fields of the structure and the buffer used to send data to and get data from IOCTL, hence we can directly move to code. Again the comment " /*We now have the port number*/" from previous code is kept to give a context of where the following piece of code lies.

 1
 2
 3
 4
 5
 6
 7
 8
 9
10
11
12
13
14
15
16
17
18
        /*We now have the port number*/

        /*Prepare USB request packet (USB_DESCRIPTOR_REQUEST)*/
        USB_DESCRIPTOR_REQUEST* requestPacket = nullptr;
        USB_DEVICE_DESCRIPTOR* deviceDescriptor = nullptr;
        int bufferSize = sizeof(USB_DESCRIPTOR_REQUEST) + sizeof(USB_DEVICE_DESCRIPTOR);
        BYTE *buffer = new BYTE[bufferSize];

        /*We know from out previous discussion that the first part of the buffer contains the request packet, and latter part contains the data to be filled by the IOCTL - in our case the device descriptor*/
        requestPacket = (USB_DESCRIPTOR_REQUEST*)buffer;
        deviceDescriptor = (USB_DEVICE_DESCRIPTOR*)((BYTE*)buffer + sizeof(USB_DESCRIPTOR_REQUEST));

        //fill information in packet
        requestPacket->SetupPacket.bmRequest = 0x80;
        requestPacket->SetupPacket.bRequest = USB_REQUEST_GET_DESCRIPTOR;
        requestPacket->ConnectionIndex = usbPortNumber;
        requestPacket->SetupPacket.wValue = (USB_DEVICE_DESCRIPTOR_TYPE << 8 | 0 /*Since only 1 device descriptor => index : 0*/);
        requestPacket->SetupPacket.wLength = sizeof(USB_DEVICE_DESCRIPTOR);

Step 5 : Issue IOCTL, and print some data 

Now we simply have to issue the ioctl, passing the prepared request packet, and data buffer.


1
2
3
4
5
6
7
        /*Issue ioctl*/
        DWORD bytesReturned = 0;
        BOOL err = DeviceIoControl(hUsbHub, IOCTL_USB_GET_DESCRIPTOR_FROM_NODE_CONNECTION, buffer, bufferSize, buffer, bufferSize, &bytesReturned, nullptr);

        /*print some data*/
        std::cout << "0x" << std::hex << (int)deviceDescriptor->bDescriptorType << std::endl;  //should be 0x01 for device descriptor
        std::cout << "0x" << std::hex << (int)deviceDescriptor->bDeviceClass << std::endl;

Complete code

The complete code, consisting of all the individual code fragments we have developed so far is the following. Note that before running this code you must add Setupapi.lib in Linker's Additional dependencies. The application I built, and for which the code is given is a Native console application written in C++.

My system configuration :
                   Visual Studio 2017 Professional
                   Windows 10 14393 build


 1
 2
 3
 4
 5
 6
 7
 8
 9
10
11
12
13
14
15
16
17
18
19
20
21
22
23
24
25
26
27
28
29
30
31
32
33
34
35
36
37
38
39
40
41
42
43
44
45
46
47
48
49
50
51
52
53
54
55
56
57
58
59
60
61
62
63
64
65
66
67
68
69
70
71
72
73
74
75
76
77
78
79
80
81
82
83
84
85
86
87
88
89
// USBGetDeviceDescriptor.cpp : Defines the entry point for the console application.
//

#include "stdafx.h"
#include <iostream>
#include <Windows.h>
#include <SetupAPI.h>
#include <cfgmgr32.h >
#include <initguid.h>
#include <usbiodef.h>
#include <usbioctl.h>
#include <regex>

void USBGetDeviceDescriptor()
{
    /*A set containing info about all USB devices present on the system*/
    HDEVINFO usbDeviceInfoSet = SetupDiGetClassDevs(&GUID_CLASS_USB_DEVICE, NULL, NULL, (DIGCF_PRESENT | DIGCF_DEVICEINTERFACE));

    /*Iterate over the set to obtain info about each device in it*/
    SP_DEVINFO_DATA deviceData;
    deviceData.cbSize = sizeof(SP_DEVINFO_DATA);

    for(int i = 0; SetupDiEnumDeviceInfo(usbDeviceInfoSet, i, &deviceData); i++)
    {
        /*The tuple <usbDeviceInfoSet, deviceData> uniquely identifies a USB device in the system*/

        /*Get parent hub handle*/
        DEVINST parentDevInst = 0;
        CM_Get_Parent(&parentDevInst, deviceData.DevInst, 0);
        wchar_t deviceId[MAX_PATH];
        CM_Get_Device_ID(parentDevInst, deviceId, MAX_PATH, 0);
        std::wstring devIdWStr(deviceId);

        //convert device id string to device path - https://stackoverflow.com/a/32641140/981766
        devIdWStr = std::regex_replace(devIdWStr, std::wregex(LR"(\\)"), L"#"); // '\' is special for regex
        devIdWStr = std::regex_replace(devIdWStr, std::wregex(L"^"), LR"(\\?\)", std::regex_constants::format_first_only);
        devIdWStr = std::regex_replace(devIdWStr, std::wregex(L"$"), L"#", std::regex_constants::format_first_only);

        constexpr int sz64 = 64;
        wchar_t guidString[sz64];//guid is 32 chars+4 hyphens+2 paranthesis+null => 64 should be more than enough
        StringFromGUID2(GUID_CLASS_USBHUB, guidString, sz64);
        devIdWStr.append(guidString);

        std::wstring& usbHubPath = devIdWStr; //devIdWStr now contains USB hub path
        HANDLE hUsbHub = CreateFile(usbHubPath.c_str(), GENERIC_WRITE, FILE_SHARE_WRITE, NULL, OPEN_EXISTING, 0, NULL);

        /*hUsbHub now contains the handle to the parent hub of a device*/

        /*Get port number to which the usb device is attached on the hub*/
        DWORD usbPortNumber = 0, requiredSize = 0;
        SetupDiGetDeviceRegistryProperty(usbDeviceInfoSet, &deviceData, SPDRP_ADDRESS, nullptr, (PBYTE)&usbPortNumber, sizeof(usbPortNumber), &requiredSize);

        /*We now have the port number*/

        /*Prepare USB request packet (USB_DESCRIPTOR_REQUEST)*/
        USB_DESCRIPTOR_REQUEST* requestPacket = nullptr;
        USB_DEVICE_DESCRIPTOR* deviceDescriptor = nullptr;
        int bufferSize = sizeof(USB_DESCRIPTOR_REQUEST) + sizeof(USB_DEVICE_DESCRIPTOR);
        BYTE *buffer = new BYTE[bufferSize];

        /*We know from out previous discussion that the first part of the buffer contains the request packet, and latter part contains the data to be filled by the IOCTL - in our case the device descriptor*/
        requestPacket = (USB_DESCRIPTOR_REQUEST*)buffer;
        deviceDescriptor = (USB_DEVICE_DESCRIPTOR*)((BYTE*)buffer + sizeof(USB_DESCRIPTOR_REQUEST));

        //fill information in packet
        requestPacket->SetupPacket.bmRequest = 0x80;
        requestPacket->SetupPacket.bRequest = USB_REQUEST_GET_DESCRIPTOR;
        requestPacket->ConnectionIndex = usbPortNumber;
        requestPacket->SetupPacket.wValue = (USB_DEVICE_DESCRIPTOR_TYPE << 8 | 0 /*Since only 1 device descriptor => index : 0*/);
        requestPacket->SetupPacket.wLength = sizeof(USB_DEVICE_DESCRIPTOR);

        /*Issue ioctl*/
        DWORD bytesReturned = 0;
        BOOL err = DeviceIoControl(hUsbHub, IOCTL_USB_GET_DESCRIPTOR_FROM_NODE_CONNECTION, buffer, bufferSize, buffer, bufferSize, &bytesReturned, nullptr);

        /*print some data*/
        std::cout << "0x" << std::hex << (int)deviceDescriptor->bDescriptorType << std::endl;  //should be 0x01 for device descriptor
        std::cout << "0x" << std::hex << (int)deviceDescriptor->bDeviceClass << std::endl;


    }
    
}

int main()
{
    USBGetDeviceDescriptor();
    return 0;
}

Output

Here is the annotated output from one run of the application on my system.
Sample run

References

  1. USB request data structure explained on USB in a nutshell - https://www.beyondlogic.org/usbnutshell/usb6.shtml
  2.  Information on data stage, and related stuff in chapter 5 of USB COMPLETE book (5th edition) by Jan Axelson. Must read this book if you are developing any non trivial USB application.
  3. Getting handle to parent hub directly from <usbDeviceInfoSet, deviceData> tuple of a device - https://stackoverflow.com/q/28007468/981766
  4. SPDRP_ADDRESS property gives the port number in case of USB devices is mentioned here - https://web.archive.org/web/20100109085245/http://msdn.microsoft.com/en-us/library/dd852021.aspx
  5. A list of USB class codes (till USB 1.0) - http://www.usb.org/developers/defined_class