Friday, 16 December 2016

Libclang python : hello world!

Many a time we are faced with the challenge of trying to understand large code repositories for various reasons. There is a plethora of tools out there, but sometimes you just get stuck with a problem for which there simply isn't any tool. One such problem hit me today, I wanted to find the call graph of a function, say A, and check where a function, say B lies in it, and what's the call path if I want to go from function A to B.

This is where code analysis libraries enter. They allow us to parse source code in a programmatic way, thus for my case - no more manually exploring the call path.
One such library is libclang (from the awesome CLANG/LLVM project). libclang is for c, but it has python bindings as well, which we are going to explore.

Credits - The following awesome blog helped me in getting started with libclang, and some code, and examples may be from it.

http://eli.thegreenplace.net/2011/07/03/parsing-c-in-python-with-clang

Before you proceed, make sure of the following.

  • LLVM(Clang) is installed, and is present in computer's path
  • minGW is installed, and is present in computer's path
  • You are using 32bit (x86) windows OS (I was unable to use it on x64 windows, I kept getting access violation errors, which is perhaps due to a known bug). I have not tested this on Linux, but it should work on x32 Linux equally well.
  • Install python clang module from "https://github.com/llvm-mirror/clang/tree/master/bindings/python"
    Here are the steps -
       a. Download clang folder from the link
       b. Put it in python's lib folder. On my windows 7 x86, I had to paste it in "C:\Python27\Lib".
           
    If you are not sure where the lib folder is on your system, open a python console, import a module for which you are sure that it exists in your system, say ctypes, and print the value of ctypes.__file__. This will give you an idea about the location of the folder. See the following screenshot.
Finding python lib folder


Let's suppose we have the following C++ code that we want to parse.


//demo_code.cpp
class Person {
};


class Room {
public:
    void add_person(Person person)
    {
        // do stuff
    }

private:
    Person* people_in_room;
};


template <class T, int N>
class Bag<T, N> {
};


int main()
{
    Person* p = new Person();
    Bag<Person, 42> bagofpersons;

    return 0;
}

Let's start writing the python script which will parse this code.

Step 1 Import clang


import clang.cindex

Step 2 Load the C++ source code


index = clang.cindex.Index.create()
translation_unit = index.parse("demo_code.cpp")

Step 3 Get an iterator over the syntax tree of the source code, and print some tokens


print 'Translation unit:', translation_unit.spelling
for child in translation_unit.cursor.get_children():
   print child.spelling

for node in translation_unit.cursor.walk_preorder():
   print "pre-order-traversal",node.spelling,node.get_usr()

See the following screenshot.


python libclang parsing over our source code demo_code.cpp
Few things to note

  1. spelling member in python code tells the name of the token we are referring to.
  2. get_usr() gives us something called as Unified Symbol Resolution, this is like a global name for the token we are referring to. This helps is identifying a token uniquely when we have multiple source files.
Here is the complete python code.


import sys
import clang.cindex

index = clang.cindex.Index.create()
translation_unit = index.parse("demo_code.cpp")
print 'Translation unit:', translation_unit.spelling
for child in translation_unit.cursor.get_children():
    print child.spelling
for node in translation_unit.cursor.walk_preorder():
    print "preorder",node.spelling,node.get_usr()

This is my first attempt at parsing source code via a python script, and I believe it will help me greatly  in debugging and understanding source codes, as I learn more. Hope it helps you as well.

References-
  • Installing clang on windows - http://blog.johannesmp.com/2015/09/01/installing-clang-on-windows-pt2
  • Parsing C++ in Python with Clang - http://eli.thegreenplace.net/2011/07/03/parsing-c-in-python-with-clang
  • libclang slides - http://llvm.org/devmtg/2010-11/Gregor-libclang.pdf

Wednesday, 3 August 2016

UEFI Application Networking - Simple Client/Server application

This post is to demonstrate how you can do TCP/IP networking in UEFI applications.
I assume that you have BITS installed on a USB drive, if you haven't see this post.

It is important that you have enabled UEFI networking in the BIOS settings, on my laptop I had to enable this after enabling UEFI. The way to do this may wary from machine to machine. I was unable to do this on my desktop, which is a 2012 machine running Intel Visual BIOS. Here are the screenshots.


Enabling UEFI network stack
Once this is done, simply boot the USB drive, open the python console and write the following code.
Notice the automatic DHCP configuration.

Client


#client code
from socket import *
s=socket(AF_INET,SOCK_STREAM)
s.connect(("192.168.0.107",1010))
s.send("Hello world!\n")

Note that I am assuming that I have two hosts, and the IP addresses that they have are "192.168.0.107", and "192.168.0.103". Change these values accordingly.

Test this client by creating a netcat server on "192.168.0.107", listening on port 1010.


#on 192.168.0.107
echo "Hi!"|sudo nc -l 1010

Here are the screenshots.
UEFI client running on 192.168.0.103 - Notice IP automatic configuration

netcat server running on an ubuntu host (192.168.0.107)
If however you get the EFI_TIMEOUT error, as shown in the following, check for the following.

  • The Ethernet wire is connected
  • DHCP server is running
If you still are getting this error, as it happened with me, try updating the BIOS. Updating the BIOS worked for me.

If you are getting EFI_NOT_FOUND error, check for the following.
  • UEFI network stack is enabled (as shown above).
  • Your BIOS supports UEFI networking.
Here are the screenshots for the errors.

EFI_TIMEOUT

EFI_NOT_FOUND
SERVER


#Server code
from socket import *
s = socket(AF_INET,SOCK_STREAM)
s.bind(("192.168.0.103",1010))
s.listen(1)
conn,addr = s.accept()
print 'Connected with ' + addr[0] + ':' + str(addr[1])
conn.send("Hello world!\n")
conn.recv(4)

To test this server, connect to it using netcat.


echo "Hi!"|sudo nc 192.168.0.103 1010

Here are the screenshots.

UEFI server running on 192.168.0.103 - Notice IP automatic configuration

netcat client running on an ubuntu host (192.168.0.107)
As in case of client, you may face EFI_TIMEOUT, or EFI_NOT_FOUND error, their resolution will be same as discussed there.

If you want to write a similar UEFI application in C, then try to dive into python code in BITS to see how it is making the use of UEFI run time.

This was just a proof of concept, for demonstrating how a UEFI application can use networking, and therefore the examples are fairly simple. Once networking is established, the possibilities are limitless.

Resources -
  1. My Github repo for UEFI

Getting started with UEFI application development

There are times in your life when you feel something is impossible, but you keep persisting, until you make a small crack, and then everything looks so obvious to you, and you think, "Gosh! It's so easy!". This is the first time I tried developing a UEFI application. What I thought would be a one night hack, took me almost two days, two troublesome days. UEFI application development lacks a lot in user created created content - blogs, examples, discussions, forums, etc. For developing UEFI we have a 2700 page UEFI spec, and other esoterically written documents, which would not appeal an average developer just wanting to try out stuff.

I am going to share my experiences with UEFI, in the hope that it will save trouble for someone else trying to do the same.

I am running Ubuntu 15.10 on ASUS K55VM, which is a 64bit i7 laptop, manufactured in 2012.

First things first

Before moving any further, I would suggest you to go through this blog, to get a taste of developing and running a very simple UEFI application: Programming for EFI: Creating a "Hello, World" Program .

UEFI development is different from developing your usual C/C++ application. For example you will not find any "main()" function, since the entry point to the UEFI application is given by the associated configuration file.

for eg. In the "MyWorkSpace/AppPkg/Applications/Hello" application in UDK (UEFI development kit), the entry point of Hello application is defined in "Hello.inf".


[Defines]

   INF_VERSION                    = 0x00010006
   BASE_NAME                      = Hello
   FILE_GUID                      = a912f198-7f0e-4803-b908-b757b806ec83
   MODULE_TYPE                    = UEFI_APPLICATION
   VERSION_STRING                 = 0.1
   ENTRY_POINT                    = ShellCEntryLib

The ShellCEntryLib library instance wraps the actual UEFI application entry point and calls the ShellAppMain function.

Setting up the development environment

There are several SDKs for developing UEFI, I have tried two of them - EDK2, and BITS (BIOS Implementation Test Suit) (I also tried UDK, but without much luck, EDK2 and UDK look quite the same to me, maybe they are, maybe it's because I tried EDK2 at a later stage, when I had better understanding that it worked). Although it is recommended you download both, as it will help in finding code samples from both the suits, personally I feel BITS is better since, it provides with a python shell, which makes it very easy for beginners like me to try out stuff.

1. BITS (Recommended)
  • Clone the repository

git clone --recursive --depth 1 https://github.com/biosbits/bits


  • Read "README.Developers.txt" , and install the dependencies.

sudo apt-get install xorriso mtools binutils bison flex autoconf automake

  • Make

make

  • Now you will have "bits-latest.zip", in the folder, extract it, and "cd" into it.

unzip bits-latest.zip
cd bits-2001/

  • Prepare a USB drive, on which the UEFI application can be loaded. I will assume that the USB drive is /dev/sdb, and it gets mounted at /media/uefi, change these according to what you see in your PC.

#get rid of partition table, and partitions (optional)
sudo dd if=/dev/zero of=/dev/sdb bs=1M count=512


#make sure the write is flushed to USB
sync

#create mbr partion table, a new partition, and set bootable flag on this
sudo fdisk /dev/sdb

#fdisk console starts
  Command (m for help): o
  Created a new DOS disklabel with disk identifier 0xf1fa6ab4.

  Command (m for help): n
  Partition type
     p   primary (0 primary, 0 extended, 4 free)
     e   extended (container for logical partitions)
  Select (default p): 

  Using default response p.
  Partition number (1-4, default 1): 
  First sector (2048-15633407, default 2048): 
  Last sector, +sectors or +size{K,M,G,T,P} (2048-15633407, default 15633407): 

  Created a new partition 1 of type 'Linux' and of size 7.5 GiB.

  Command (m for help): a
  Selected partition 1
  The bootable flag on partition 1 is enabled now.

  Command (m for help): w
  The partition table has been altered.
#fdisk console ends

#sync to make sure all changes are done
sync


  • To make sure that the changes to disk have been recognized by the operating system, remove, and reinsert the USB disk.
  • Format the first partition of the disk ("/dev/sdb1") with fat32. Use gparted for this.
  • Make the disk bootable (make sure that "/dev/sdb1" is mounted at "/media/uefi", else make changes in the commands according to your system).

#run commands as root
sudo su
syslinux /dev/sdb1
cat /usr/lib/syslinux/mbr/mbr.bin > /dev/sdb


  • Copy some files from bits-2001 directory to the USB

cp -r boot efi /media/neo/uefi/
sync

Now you are ready to boot the USB disk. Make sure UEFI is enabled in BIOS settings, and select the USB drive while booting.

Once it boots, select "Python interactive interpreter". Write your first code in the python shell.


>>> print "Hello world!"

Here is a screenshot from a Dell Latitude E5450.

UEFI Python shell on Dell Latitude E5450


2. EDK2 (May Skip)


  • Build UEFI modules


git clone --depth 1 "https://github.com/tianocore/edk2.git"
cd edk2
make -C BaseTools
. ./edksetup.sh BaseTools
build -a X64 -b RELEASE -p MdeModulePkg/MdeModulePkg.dsc -t GCC46

Important : In the above bash code, notice  the line ". ./edksetup.sh BaseTools". It is "<dot><space><path to edksetup.sh><space><BaseTools>". There is no typo, the <dot><space> notation is used in bash for sourcing, see this.

Building Qemu Bios (Requires EDK2) - Running UEFI applications in QEMU

OVFM - OVMF is a port of Intel's tianocore firmware to the qemu virtual machine. This allows easy debugging and experimentation with UEFI firmware; either for testing Ubuntu or using the (included) EFI shell. All the online manuals, and resources I found for this were outdated, this is the method which finally worked for me.

Thus it is important to build an OVFM binary. Go to the edk2 folder, as above, and do the following.


cd edk2
#build ovfm
OvmfPkg/build.sh
#the built binaries will be in Build/OvmfX64 directory. FV contains firmwares
cd Build/OvmfX64/DEBUG_GCC49/FV
sudo qemu-system-x86_64 -L . -bios OVMF.fd -usb -usbdevice disk:/dev/sdb

Here are the screenshots.


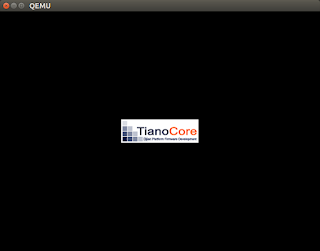
Initial splash screen - Qemu running OVFM

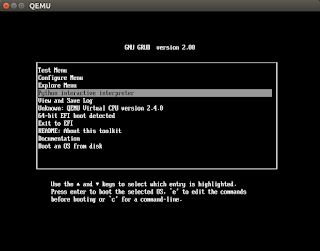
The USB drive had BITS running on it

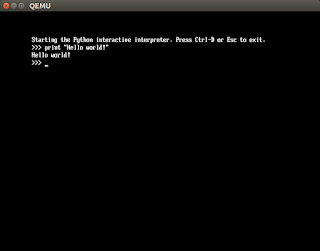
Hello world in UEFI Python shell in Qemu


Resources -
  1. My Github repo for UEFI
  2. UEFI EDK2 Build Howto On openSUSE12.1
  3. Getting Started Writing Simple Application
  4. UEFI Driver Writer's Guide
  5. Driver Developer
  6. Beyond BIOS Developing with the Unified Extensible Firmware Interface
  7. UEFI specification
  8. uefi.org learnign center
  9. Programming for EFI: Creating a "Hello, World" Program

Saturday, 30 July 2016

Recovering from a corrupted MBR partition table

I managed to corrupt two hard drives in a single day. One had GPT partition table, the other had MBR partitioning. Fortunately, I was able to recover both. This post is about recovering MBR partition table. The post for recovering GPT partition table is here.

My external hard drive got corrupted when I removed the usb wire from my computer, without properly unmounting it. It was an old drive, and had MBR partitioning. My initial reaction was to run fsck, but it didn't help. So, here is how I managed to recover my drive.

Intended audience for this post - You have a hard drive which was initially partitioned with MBR partitioning scheme, and the partition table got corrupted. The  hard drive partitions have NTFS installed on them. You are running Linux.

Tools required - testdisk, ntfsfix, gdisk

Installation-


sudo apt-get install testdisk gdisk
sudo apt-get install ntfs-3g #on some distributions do "sudo apt-get install ntfsprogs" instead


Making sure, you have MBR partitioning on the disk


sudo gdisk -l /dev/sdX

#GPT formatted drive will show the following

Partition table scan:
  MBR: protective
  BSD: not present
  APM: not present
  GPT: present

Found valid GPT with protective MBR; using GPT.

#MBR formatted drive will show the following

Partition table scan:
  MBR: MBR only
  BSD: not present
  APM: not present
  GPT: not present


If the disk is MBR, then continue as follows, else if you have GPT disk, see this.

Recovery procedure

The recovery consists of two parts.

  1. Recovering partition table.
  2. Recovering file system(s).
1. Recovering partition table

Run testdisk.


sudo testdisk


In testdisk select the disk on which you want to run the recovery. Then select the partitioning scheme, which is "[Intel  ] Intel/PC partition" in our case. After that, tell testdisk to search for partitions on the disk, by selecting "[ Analyse  ] Analyse current partition structure and search for lost partitions". testdisk will then search the drive for partitions, on selecting "Quick Search". It will now show a list of partitions found. Press "Enter" to continue. If a partition is not listed, try "Deeper Search" in the screen that appears next. When all the partitions that you want to add are shown (i.e. all the partitions that were there before the disk got corrupted), select "Write". testdisk will then write a new partition table to disk, consisting of the found partitions.

Here are the screenshots. Note that these were taken after I recovered my disk, and are for illustrating the steps only. There may be slight variation in what you see.

options for log creation

select disk on which to perform recovery

Select partitioning style

Select Analyze

Search for partitions

List of found partitions

Write changes to disk


Once this is complete, you will be able to see partitions of the disk. In my case however, the file system too was corrupt, so I had to recover that as well.

2. Recovering file system(s)

The file system on my disk was ntfs, therefor I had to use ntfsfix, the recovery procedure will differ if you have a different file system. If your disk also had a boot loader, it can be recovered using boot-repair, as explained here.

To recover the ntfs file system, simply run ntfsfix on the corresponding partition of the device (by now you should have recovered the partition table, hence /dev/sdX1, /dev/sdX2, etc. files corresponding to different partitions of the disk should be available, if not, try unplugging the disk, and then plugging it back again).
For example if I had ntfs partition on /dev/sdX1, where /dev/sdX is the disk on which we are attempting recovery. The command will be the following.


sudo ntfsfix /dev/sdX1


Note that there can be several reasons for the file system to get corrupted, and there are several tools and methods for recovery. This post written to describe the problem I faced, and the recovery method that worked for me, with a hope that it will help someone stuck in a similar situation.

All the best !!

Recovering from a corrupted GPT partition table, and why to prefer GPT over MBR

Recently, I accidently overwrote the partition table of my hard disk, due to incorrect use of dd command. Fortunately I had a GPT partition table, and therefore recovery was easy.  The DD command only overwrote the first sector (or maybe the first 4 sectors, I don't remember exactly , but surely not more than that). My hard drive has 512 byte sectors, and while trying to remap a bad sector using dd, I used 'skip' instead of 'seek', and so instead of writing on the bad sector, the dd wrote on the first sector (When you try to write on a bad sector, the hard drive automatically remaps it to a new sector, this is a way to get rid of bad sectors from a hard drive, and don't worry about it if you don't understand). If however you have overwritten more than the partition table, and perhaps even corrupted the data written on disk, then this post may not be for you.

Few words about gpt

GPT has two data structures that it uses - GPT header, and GPT partition table. Thus both have to be present for it to work, and if either gets corrupted, GPT will not work. Both of these data structures are written at two places on the disk to provide redundancy, in case one of them gets corrupted.

GPT offers the following advantages over MBR, which helped me in recovery.

  • It uses CRC so, softwares can easily detect if either your partition table, or your GPT header is corrupted.
  • GPT places a backup of partition table and headers at the last sector of the disk, so if the first few sectors get corrupted, as in my case, the partition table can still be recovered from the backup.


Audience for this post - You have either a corrupt primary GTP partition table and header, or a corrupt secondary(backup) GTP partition table and header, but not both. You are running Linux.

Tools used - gdisk, boot-repair

Installing software


#gdisk
sudo apt-get install gdisk

#boot-repair
sudo apt-add-repository ppa:yannubuntu/boot-repair
sudo apt-get update
sudo apt-get install -y boot-repair


Making sure that the partitioning style of your disk is GPT


sudo gdisk -l /dev/sdX

#GPT formatted drive will show the following

Partition table scan:
  MBR: protective
  BSD: not present
  APM: not present
  GPT: present

Found valid GPT with protective MBR; using GPT.

#MBR formatted drive will show the following

Partition table scan:
  MBR: MBR only
  BSD: not present
  APM: not present
  GPT: not present


If the disk is GPT, then continue as follows, else if you have MBR disk, see this.

Recovery procedure

From now on, we will assume that the primary data structures of GPT are damaged and we will try to recover from the secondary, i.e. the backup. From recovering the other way, i.e. from primary to secondary, the process is similar, and you just have to select different options in gdisk.
It is advisable to use a live disk to do this.

I. Recovering partition table


sudo gdisk /dev/sdX


gdisk shell will open now. Enter 'r' to select recovery option.
From the recovery option, enter 'b', to recover GPT header from secondary (backup), and then enter 'c' to recover GPT partition table from secondary (backup).
Then select 'v', and then 'w' to verify, and write to disk.

Here is the full log.


sudo gdisk /dev/sda

GPT fdisk (gdisk) version 1.0.1

Partition table scan:
  MBR: protective
  BSD: not present
  APM: not present
  GPT: present

Found valid GPT with protective MBR; using GPT.

Command (? for help): r

Recovery/transformation command (? for help): b

Recovery/transformation command (? for help): c
Warning! This will probably do weird things if you've converted an MBR to
GPT form and haven't yet saved the GPT! Proceed? (Y/N): Y

Recovery/transformation command (? for help): v

No problems found. 3437 free sectors (1.7 MiB) available in 2
segments, the largest of which is 2014 (1007.0 KiB) in size.

Recovery/transformation command (? for help): w


This will recover the partition table, the recovery of grub is still left.

II. Recovering grub (boot-loader)

Run boot-repair.


sudo boot-repair


Now, follow through the options using either Recommended repair, or advanced options. It will then suggest several commands to execute in a terminal.

Now, you will have recovered both the partition table, and grub boot loader.
Hope it helped.

Tuesday, 17 May 2016

Generating call graph of c code - Linux call graphs

Recently I was trying to analyse the manner in which kernel modules  get installed in a Linux kernel. After spending a lot of time rummaging through code of "kernel/module.c" in the Linux source file using ctags, cscope, and vim, I could only discover a few functions. As a side note, the following two functions are the main system calls which are used by tools like insmod, modprobe, etc. to load a kernel module.
  • init_module() - kernel/module.c
  • finit_module() - kernel/module.c
The latter function was added in Linux 3.8, and allows loading module using the file descriptor of the module's file. This is useful when authenticity of the module can be determined from its location in the file system. The former is the older system call and expects a binary elf image of the module to be supplied to it. Both these functions call "load_module()" defined in the same file, which was the centre of my research.

This is when the idea of generating and analysing call graphs struck me. I will start with explaining how to generate the call graph of a simple c program, then we will move forward to generate call graphs of "module.c" present in "<Linux_source>/kernel/module.c".


Note - I learnt about generating call graphs from this page. This blog post of mine, is written to add additional insights I got while following the instructions over there.

Installing the required tools
  1. graphviz
    • sudo apt-get install graphviz
  2. egypt - website
    • wget "http://www.gson.org/egypt/download/egypt-1.10.tar.gz" 
    • perl Makefile.PL
    • make
    • make install 
Generating call graph

Generating a call graph is a 3 step process.
  1. Compiling c code with -fdump-rtl-expand flag set.

    eg.
    gcc myfile.c -fdump-rtl-expand


    This will cause gcc to generate and rtl file, which represents c code in an intermediate format, which is easier to parse for call-graph than the original c code. More about rtl can be found here.
  2. Converting the obtained expand file to a representation understood by dot utility of the graphviz package. This is done by the egypt software.

    eg.
    egypt myfile.c.192r.expand


    This converts the rtl description present in myfile.c.192r.expand file to a simple directed graph representation. If function f1 calls function f2, the representation will be simply "f1"->"f2".

    This is a very simple directed graph representation of the call graph, and thus we can do a lot of processing in this stage, for example colouring certain edges, changing stroke styles, etc. More about this later.
  3. Creating svg using dot utility of graphviz package.

    Pipe the output of the previous stage to dot.

    eg.

    egypt myfile.c.192r.expand | dot -Tsvg -o myfile_callgraph.svg
    

    Explanation -
                           -T : output language, here svg
                           -o : output file name
    For more options refer to man page of dot (man dot).

Example 1 - a simple c program to find nth Fibonacci number.


#include<stdio.h>

int fib(int n){
if(n<=2) return 1;
return fib(n-1)+fib(n-2);
}

int main(){
int n=10,x=0;
x=fib(10);
printf("%d",x);
return 0;
}

Save it as fib.c. Issue the following commands:
  • gcc -fdump-rtl-expand fib.c 
    

  • egypt fib.c.192r.expand |dot  -Tpng -o fibonacci_call_graph.png #note png instead of svg - to upload image to Blogger. Blogger doesn't support svg.
    
We will get the following call graph.


Example 2 - "module.c" in "<Linux_source>/kernel/module.c"
  • Edit module/Makefile and add the following lines

    ccflags-y+=-fdump-rtl-expand
    CCFLAGS+=-fdump-rtl-expand
    

  • OR, pass it as argument to make.

    make CFLAGS="-g -fdump-rtl-expand"
    

  • compile Linux.

    make
    

  • Pass the generated module.c.192r.expand to dot to generate graph png or svg.

    egypt module.c.192r.expand | dot -Tsvg -o module_callgraph.svg
    
There will be several ".expand"  files generated in "<Linux_source>/kernel/" directory, we can make a large call graph, containing the interleaving of functions from all these files simply by passing them to egypt.


egypt *.expand | dot -Tsvg -o module_callgraph.svg


To include function names of functions which don't have their code in Linux source tree, use "--include-external" option in egypt.

  
egypt --include-external *.expand | dot -Tsvg -o module_callgraph.svg


Editing directed graph (digraph) generated by egypt

Since the representation of call graph generated by egypt is very simple, we can use several attributes of graphviz's dot language (given here). For example in the svg file obtained from module.c.192r.expand, we want to colour all incoming arcs to the function "load_module()" red. we can use the following script.


egypt module.c.192r.expand |awk '{if ($3 == "\"load_module\"") {$4="[style=solid color=red]";} print $0; }'|dot -Tsvg -o module_callgraph_coloured.svg


Look at dot's man page, it contains a plethora of options that can be used to customized various aspects of the graph, Things like graph size, rotation etc. can be specified by passing command-line arguments to dot.

Additional Resources - 
  1. ftracer  - A toolkit for tracing C/C++ program(including multi-thread program), it can generate a call graph for you. Link.
  2. gprof2dot - This is a Python script to convert the output from many profilers into a dot graph. Link.
  3. stackoverflow.com discussion. Link.
  4. LD_PRELOAD, and LD_DEBUG - Link1 , Link2, also see its usage in ftracer.

Note - My various attempts to generate expand files for code in every directory of Linux source failed. I tried adding "-fdump-rtl-expand" flag in the Makefile present in the root of source, exporting CFLAGS, CCFLAGS, etc. from bash, but it didn't work. Only when I added the flag to make file in "<Linux_source>/kernel/" director, the expand files for the c-files in the directory were generated. It may not be a wise idea anyway to generate a call graph for the entire kernel. The call graph for module.c itself is quite large, making it difficult to interpret using traditional tools.

Note - The discussion on this page is for generating call graph for code written in c only.

Update - The call graphs can also be generated using doxygen by enabling it in its configuration file before running it on the source tree.

Wednesday, 24 February 2016

Installing and running Dell Dvd store (dvdstore ds2.1) benchmark

Dell DVD store simulates and online dvd store for ordering DVDs. I stumbled upon it while reading a VMware paper [Link]. As it was being used by VMware, I thought it would be a decent workload to do some memory benchmarks on a few linux containers. The instructions for download and usage can be found here. The gzip files available for download also have a lot of text files for explanation.

Following the instructions given on the site, as well as in the README files, I was not able to run the benchmark. Before delving into the problems, and the way I was able to solve them, let me first introduce you to the way the benchmark works.

Firstly, Dell DVD store wants us to set up the VMs we want to test. Then a machine separate from the one no which these VMs are located is required to be set up (The machine should be separate to limit  interference to the tests). This machine is also known as the driver, and is used to run the benchamarks on the VMs, and to collect statistics fro them. The driver sends a bunch of queries to the database running in the machines under test, and measures performance.
In my case I had set up two Linux containers, each running ubuntu (consider Linux container as a VM if you are not sure about what it means), and mysql as the database. The driver machine was a Windows 7 desktop (Although Linux too can be used, with mono (for .Net framework) installed, but some other steps that I am going to show, may not be as straightforward on Linux).

For setting up the machines under test, run "Install_DVDStore.pl" in them. This scipt will generate data files which have to be loaded into a database. Now open a mysql prompt (I had mysql databse, however dvdstore supports many other as well), and type the folowing commands.


mysql --password='MySqlpasswordOfYourUser' < mysqlds2_create_db.sql
mysql --password='MySqlpasswordOfYourUser' < mysqlds2_create_ind.sql
mysql --password='MySqlpasswordOfYourUser' < mysqlds2_create_sp.sql 
Note: Before issuing these commands, you will have to edit these file and replace all occurrences the word TYPE by ENGINE. TYPE corresponds to an earlier version of syntax, which is no longer supported.

These will be present in build directory.

For setting up the driver machine run "CreateConfigFile.pl" in it, and answer the prompts.

Finally the driver can be run with the following command.
./ds2mysqldriver.exe --config_file=../DriverConfig.txt
Where "DriverConfig.txt" is the file created by "CreateConfigFile.pl" script.

Following is the list of problems I encountered. These arose mainly because the benchmark seems to be an old one, which is no longer updated.
  1. ./ds2_create_cust not found : No such file or directory
  2. ./ds2_create_inv not found : No such file or directory
  3. ./ds2_create_prod not found : No such file or directory
  4. Could not load file or assembly 'Mysql.Data' . The exact error message was:

     Could not load file or assembly 'MySql.Data, Version=6.3.6.0, Culture=neutral, PublicKeyToken=c5687fc88969c44d' or one of its dependencies. The located assembly's manifest definition does not match the assembly reference. (Exception from HRESULT: 0x80131040)
  5. Then there was issue of granting access to mysql database, so that the driver can connect to it and query. This was not a problem in the benchmark, only a configuration issue that I had to sort before the benchmark ran without any errors.
Disclaimer: The steps shown will allow you to run the benchmark, but I do not guarantee that the benchmark will perform as expected. In my case the benchmark has been running for almost 5 hours, I can comment once it successfully completes.

The first 3 errors are relatively straightforward to solve. The reason for them is that my containers were running 64 bit Ubuntu, and the binaries were compiled for 32-bit OS. I agree that the error reported is a bit misleading. So to make them run on a 64 bit OS, either they can be recompiled for 64 bit (code present along with the benchmark), or support for 32 bit binaries can be added to 64-bit Ubuntu. Latter is much easier, and we just have to do an "apt-get install".

sudo apt-get install libc6-i386
The 4th Problem wasn't that easy to solve, and required a fair bit of effort. I had to decompile the binary "ds2mysqldriver.exe", present in mysqlds2 folder. Here are the steps.


  • Download ILSpy from ilspy.net.
  • Open ds2mysqldriver.exe in ILSpy, it will then decompile the executable.
  • Select on the folder, ds2mysqldriver, and then click on File->Save Code. It will look like the following.


  • Now you'll have a visual studio project for ds2mysqldriver.exe in the directory you saved ILSpy code.
  • Open the project in Visual Studio (Or any other IDE that supports C#).
  • Under the references of the project (under "solution explorer" tab), remove MySql.Data, and then add a new reference using "Add Reference ..." option. Select MySql.Data in the dialogue box that appears. This step will basically change the dependency of the code from an older version of the MySql.Data to a newer version. 
  • Save the solution.
  • Before building the project, you'll have to do some minor corrections in the code also. I got the following errors.

       a. Constant value '-1' cannot be converted to a 'ulong' (use 'unchecked' syntax to override) ds2mysqldriver - Use unchecked{} block around the erroneous code.
      
    b.  Cannot implicitly convert type 'int' to 'string' ds2mysqldriver - Do an explicit type conversion to string using "ToString()" method.
  • Now build the project, and use the new ds2mysqldriver.exe created, instead of the older one.
Fixing the 5th problem, that is allowing the driver program to access mysql databases running on the test machines.

  1. Open mysqld.cnf (present in directory /etc/mysql/mysql.conf.d/ ), and comment out the line bind-address = 127.0.0.1 .
  2. Open a mysql prompt, and issue the following command.
mysql> GRANT ALL PRIVILEGES ON *.* TO 'web'@'%' IDENTIFIED BY 'web' WITH GRANT OPTION ;

Now the driver can be successfully by the following command.

./ds2mysqldriver.exe --config_file=../DriverConfig.txt